Activity: Style This Page!
In this activity, you will be tasked with using CSS to style an HTML page.
Before You Begin
As we discussed earlier in this module, CSS allows us to stylize our HTML webpages with colors, fonts, and much more. It allows us to define a style once and then use it repeatedly. Exciting stuff, right? Let's dive right in!
Instructions
1. Create two files in VS Code and save them to your computer. One file should be namedindex.html, and the other should be called style.css. These should be in the same directory.
2. Copy (and save) the code below into your HTML file. This is your starting HTML.
<!DOCTYPE html>
<html>
<head>
<title>CSS Practice</title>
<!-- Link to your external CSS -->
</head>
<body>
<!-- Center -->
<h1>The Wonders of CSS!</h1>
<hr>
<h2>Fun With Text!</h2>
<!-- Change text color -->
<p>This text is red.</p>
<p>This text is blue.</p>
<p>This text is green.</p>
<!-- Change font-size -->
<p>This text is BIG!</p>
<p>This text is tiny...</p>
<!-- Center -->
<p>~~This text is centered~~</p>
<!-- Bold -->
<p>If we have something important to say, we can make it bold!</p>
<!-- Change font -->
<p>We can even change our font-family if we are feeling creative!</p>
<!-- Multiple attributes -->
<p>Try combining multiple attributes to make big, orange, bold text!</p>
<hr>
<!-- Classes -->
<p class="styledFont">We can also apply the same style to multiple HTML elements.</p>
<p class="styledFont">Each one of these lines is within a different <p> tag, yet they all have the same styling.</p>
<p class="styledFont">That's because they are all a part of the same CSS class!</p>
<p class="styledFont">CSS classes let us define a style once and let us then apply it to multiple elements!</p>
<p class="styledFont">In your external CSS file, create a style for the class styledFont.</p>
<p class="styledFont">Notice how every time you change the class styledFont, all of the text changes.</p>
<hr>
<p>Just as classes can be used to style multiple elements, id's are used to style single, unique elements. Give the following image a border by adding style attributes to your external CSS file. (Hint: Remember to include a border width, style, and color.)</p>
<!-- Border & id -->
<img id="styledImage" alt="Picture of the CSS Icon" src="https://upload.wikimedia.org/wikipedia/commons/d/d5/CSS3_logo_and_wordmark.svg">
<hr>
</body>
</html>
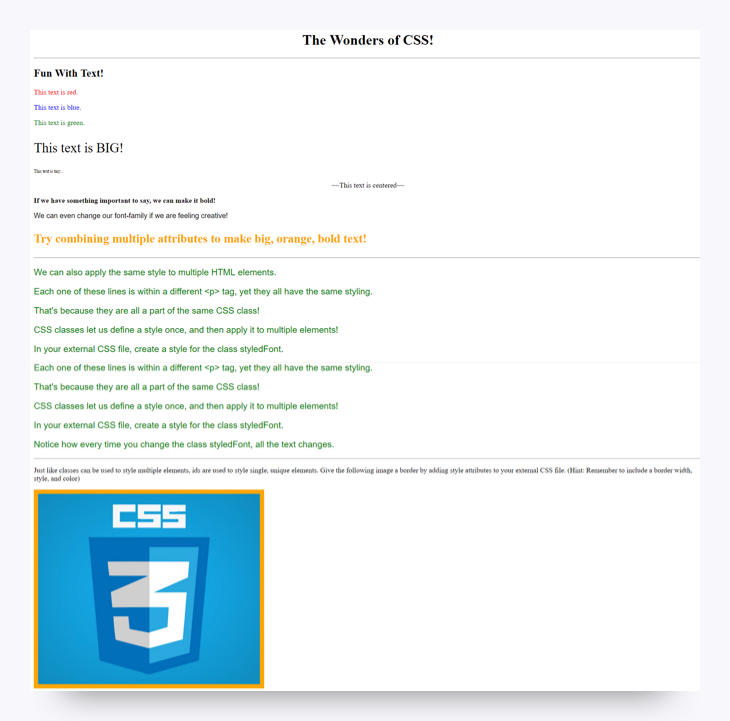
3. Write CSS in your style.css file so that each of the paragraphs of text are formatted with the appropriate styles. Your finished product should look something like the below.

4. After you finish, include both your HTML file and your CSS file in your prework folder. Place them in the Module-5 subfolder.
Bonus
Revisit your fan page from the last exercise and add some style to it using CSS.
Hints
-
You may need to modify the HTML for this to work. Think
classes. -
Look back at the working example from Module 5 to figure out how to
linkHTML and CSS files. -
When in doubt, consult W3-Schools resources like this one: HTML Styles - CSS.
Prework Support
Looking for prework support? Our team of tutors are eager to help! Request a tutor session with the following steps:
1. If not already logged in to BCS, login using your credentials (supplied 24 hours after enrollment).
2. Click Support in the top right.
3. Complete the form fields to submit your request:
-
Under Question Category, select "Tutor Request.”
-
Under Question Category, select "Request a Tutor.”
-
Under Currently, Which Sessions Would You Like to Discuss?, select “Prework assignment”.
4. Complete the additional fields and submit your request.