Module 6: JavaScript Basics
Now that you've practiced your styling skills, complete a quick check-in to see how you're feeling about using CSS:
You've covered a lot already, but now it's time to step your game up! Using JavaScript, you'll be able to power your websites with effects, interactivity, data communication, and much more. Throughout this boot camp, you'll be spending nearly 15 weeks on JavaScript alone. It's a critical tool in every web developer's arsenal, so let's take an introductory look now.
Module 6 Deliverable
For this module, you'll be creating an HTML file and a JavaScript file. You can add these files to the prework folder on your computer and place them in the Module-6 subfolder.
The Joys of JavaScript
JavaScript (or JS for short) is a high-level, dynamic programming language that underpins the web. JavaScript, along with HTML and CSS, is one of the core technologies that make our web experience what it is.
Like C++, Java, Ruby, and Python, JavaScript is written with all the fixings expected of a complete programming language. In it, you will find variables, conditionals, loops, functions, and so much more. We'll be using JavaScript extensively to create the logic that defines the behavior of our web applications.
How to JavaScript
While the full power of JavaScript is beyond the scope of this prework, let's get a small taste of what's possible.
Go ahead and open VS Code and create a new file called index.html. Then copy the below code into this file and save it somewhere on your computer.
<!DOCTYPE html>
<html>
<head>
    <title>Jiggle Into JavaScript</title>
</head>
<body>

    <p>Press the buttons to move the box!</p>

    <div id="box" style="height:150px; width:150px; background-color:orange; margin:25px"></div>

    <button id="shrinkBtn">Shrink</button>
    <button id="growBtn">Grow</button>
    <button id="resetBtn">Reset</button>

    <script type="text/javascript">

    </script>

</body>
</html>
If you view this page in the browser, you should see a page that looks like the below.
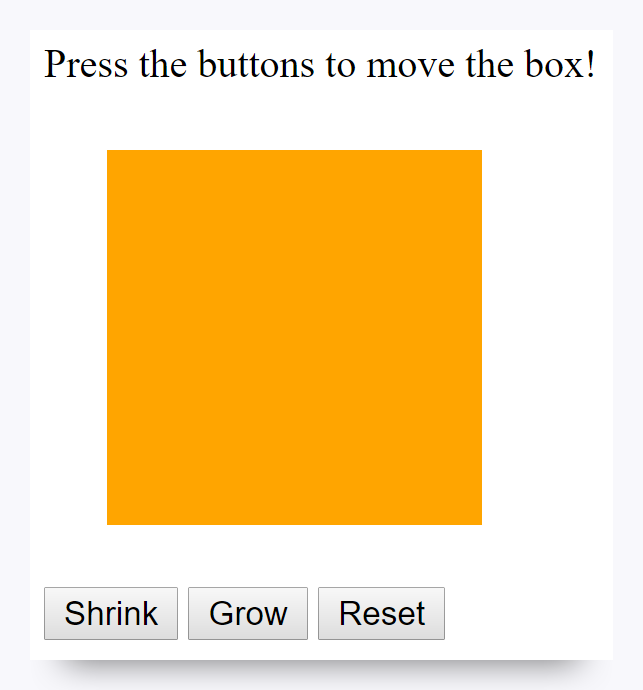
Pretty fancy!
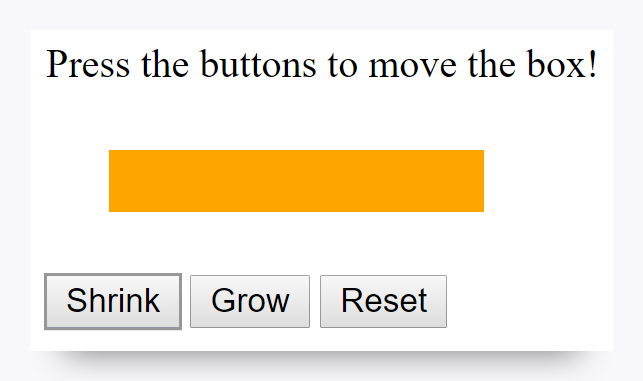
The thing is, if you try clicking the buttons, you will quickly realize that they have no impact on the position of the box. No fun whatsoever. This is where JavaScript comes in.
Copy the below code over your previous HTML file and re-save.
<!DOCTYPE html>
<html>
<head>
    <title>Jiggle Into JavaScript</title>
</head>
<body>

    <p>Press the buttons to move the box!</p>

    <div id="box" style="height:150px; width:150px; background-color:orange; margin:25px"></div>

    <button id="shrinkBtn">Shrink</button>
    <button id="growBtn">Grow</button>
    <button id="resetBtn">Reset</button>

    <script type="text/javascript">

        document.getElementById("shrinkBtn").addEventListener("click", function(){

            document.getElementById("box").style.height = "25px";

        });

        document.getElementById("growBtn").addEventListener("click", function(){

            document.getElementById("box").style.height = "250px";

        });

        document.getElementById("resetBtn").addEventListener("click", function(){

            document.getElementById("box").style.height = "150px";

        });

    </script>

</body>
</html>
Now open the file once again in the browser.
This time, clicking the buttons will lead to changes in box height.
The Magic Behind the Magic
So, how did that work?
The essence of this interactivity sits between our two script tags on lines 16 and 36. There you'll see a series of code blocks responsible for the changes being made. Let's take a moment to dissect the components:
-
The lines each begin with
document.getElementById. In a way, this is simply a reference to say, "If you ever click the button with an id that matches, then do something". These id's (e.g.,shrinkBtn,growBtn, andresetBtn) correlate with the id's of the buttons in the HTML. -
The lines then continue to say that we'll
addEventListener("click"...). This code effectively means that we'll be watching for any clicks on our targeted buttons. -
We then open up a
functionwith some code inside. This code targets theboxid and re-styles the height to an arbitrary pixel size. In a way, we're using JavaScript to dynamically change the CSS of our box in response to button clicks.
While the syntax may seem scary, the concepts are simple. Take a few moments to experiment some more. Here you can find an entire table of changes you can make using the document.style syntax we're using above.
Is That All?
Unfortunately, this simple example doesn't even scratch the surface. Through JavaScript (and its cousin jQuery), you can build truly powerful web applications with complex user interfaces, dynamic live-reloading data visualizations, geolocation tools, and more. There's so much that JavaScript can do, so come prepared to have your mind blown repeatedly over the course of the boot camp.
Your Turn!
Now it's time to step up to the JS bat. For the final prework activity, you'll be taking your elementary knowledge of JavaScript to create a box-modifying application similar to the one above. The syntax might be tricky, but through a little persistence, you'll be box-changing in no time.